iDoc Writer

Creating iDocs
Beginner
Intermediate
Advanced
Importing
Project
planner
iDoc Writer is a program that enables you to create text documents for the Apple iPod. When they are transferred to the iPod, they appear on the Notes menu and you can read them on the screen. Notes can be read on their own or while you are listening to music.
This feature would be useful on its own, but there is much more to iDoc Writer and the program creates collections of documents that are stored in folders. When transferred to the iPod, the folder name appears on the Notes menu and you can select it, then choose any of the documents to read. You can create books, manuals, articles, recipies, dictionaries, guides and much more.
The really cool feature of iPod notes is that you can create links to other notes and this is similar to the way Web pages contain hyperlinks to other Web pages. This means, for example, that you could create a book with a contents page that has links to each chapter. Similarly, a document could contain links to a glossary or other pages that the reader can jump to for further information.
The ability to link notes means that you can create collections of documents that function rather like a simple Web site. There can be a home page, links to sections, with pages in each section.
It is also possible to create interactive text adventure games by linking notes together. A page can describe a location and links labelled North, South, East and West take you to different pages with new locations. With a bit of imagination, actions can be taken and objects can be picked up and used. The best way to see how this works is to try the example included with the program.
Interactive quizzes can be created too. A note can pose a question and a list of links can provide the possible answers. Selecting a link reveals whether the user is right or wrong.
Everything from the poems of Edgar Allen Poe to the Bible to a game based on the Simpsons has been turned into iPod notes. To quote a well-used phrase, you are limited only by your own imagination.
Set up your iPod
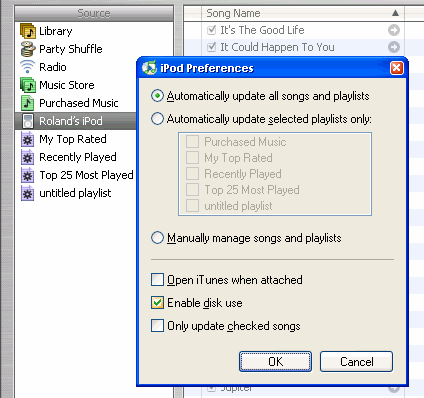
Your iPod must be enabled as a regular hard disk drive. Connect your iPod and start iTunes. Right click the iPod in the list on the left and select iPod Options. Tick Enable Disk Use.
Beginner
Select
File, New and give the project a name. This will appear on
the Notes menu of the iPod, so use something short, but descriptive.
The main screen will then appear and you can create your document.
Click in the text editing box (it looks like an iPod) and type in the text. It works in a similar way to Notepad. You can select text with the mouse or by holding down Shift and using the left and right arrow keys. Press Ctrl+X to cut the selected text, Ctrl+C to copy it and Ctrl+V to paste it. Alternatively, select Edit, Text, Cut/Copy/Paste. You can change the font size on the Edit menu, but this is just to help you see the text more clearly on the PC and the iPod only has one font size.
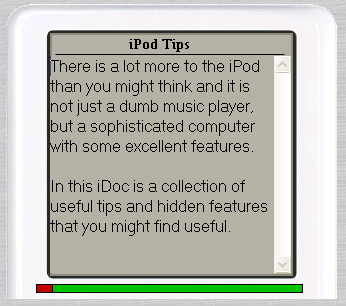
Select File, Save to save the project. You can continue to work on this document at a later date by selecting File, Open. When you have finished the document, select File, Publish and click the Publish button. Publishing turns the project into a form that the iPod understands.
You need to transfer the published project to the iPod, so plug it in and when Windows has detected it, select File, Manage. Two lists are displayed. On the left are published iDocs and on the right is a list of what's on the iPod. Select your published iDoc on the left and click the right-pointing arrow to copy it to the iPod.
That's it. Quit iDoc Writer, disconnect the iPod in the usual way and go to the iPod's Notes menu (Select Extras on the iPod's main screen and then select Notes.) Select the iDoc on the Notes menu and you will see your document. Select it to read it. When you have finished, press the Menu button to go back to the Notes menu.
Intermediate
Assuming
that you have read the Beginner section, let's move on...
The grid at the bottom of the editing screen is for selecting pages, defining page titles and for storing notes. Creating a muti-page project is easy. Just click a page in the grid and type something into the text editor (it looks like the iPod screen), enter a title, a note, or a link. As soon as you enter something, a page is created.
Pages are numbered from 001 to 999. You don't need to use every page in sequence, for example, your project can use pages 001, 002, 004, and 010. In fact, you can use this feature to organise your publication. One section could use pages 010 to 019, another might use 020 to 029, and another can be 030 to 039. Pages 001 to 009 could be the title page, intro and contents.
Page 001 will always appear at the top of the iPod menu, so make it the first page of your publication. It should contain an introduction and links to other pages.
By default, the iPod displays filenames on the Notes menu, but if you enter a title for the page, this will be displayed instead. Select a page in the grid, click the Title box and enter a title for the page. It is recommended that you enter a title for page 001 because this will appear as the first item on the iPod menu. The title should be the title of the publication. You have to entera title for every page in the publication and just a few is enough, such as the title Page, Contents and About.
You can store notes about each page. These do not appear in the finished publication and are just to help you when creating your publication. You could use the notes to indicate things to do, reminders of what pages contain, and so on. You can then glance at the table of pages and see at a glance what needs doing or what each page does.
You can cut, copy and paste a page using the toolbar or by selecting Edit, Page. Pages can be inserted, deleted or cleared. You can move pages up or down by clicking the Up and Down arrows in the toolbar too. If you move a page up or down, insert or delete a page, all the links are updated automatically. For example, if you have a page 005 and delete page 004, page 005 then becomes page 004, so all the links that pointed to page 005 are changed to point to 004. This means that your publication still works as expected.
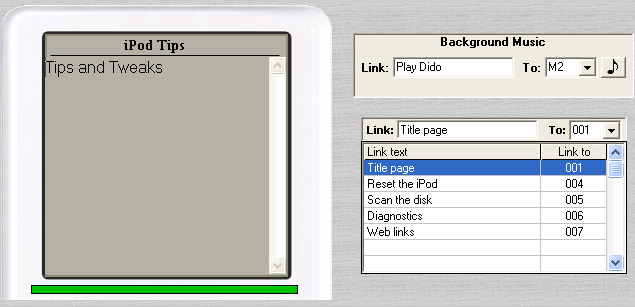
The links table on the right contains the links for each page of the publication. Links are placed at the bottom of each page. To create a link, click in the Link box and type the link text. This is what the user will see underlined on the page (rather like the blue underlined hyperlink on a Web page). Click in the To box and enter the page number to link to, such as 003, or 010. (Actually, you don't need the leading zeros and you can type 3 or 10 and so on. Select the page from the drop-down list if you prefer. You can change the order of links by clicking the Up and Down arrows in the toolbar (Link section).
Text can be pasted from the Windows clipboard. This means that you can write text in any application, such as Microsoft Word, then click the text edit box in iDoc Writer and press Ctrl+V to paste it in. This is probably preferable for long documents and you can use Word's spelling checker before copying the text too.
Advanced
Assuming
that you have read the Beginner and Intermediate sections, let's
look at the rest.
As we have seen, links can be created to other pages in a publication. iDoc Writer places these links at the bottom of the page and you can select them with the iPod scroll pad and Select button. A link can point to music and not just another page of the publication. When you select a music link, the music starts playing, but you can continue to read the rest of the page. This is called background music and a link is placed at the start of a page so that the reader can select it straight away. You can use it to add atmospheric music or sound effects to a story, or to play your favourite artist or track. You can also create regular links to music files too, and these appear at the foot of the page with all the other links. Selecting a music link plays the music.
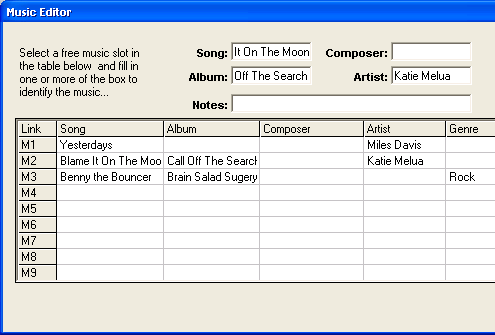
To play music, you need to use the music editor, so select Edit, Music Editor. To define a music link, select an empty slot in the table such as M1, M2, M3 and so on. Now enter the appropriate information in the boxes above labelled Song, Album, Genre and so on. You only need to enter the minimum information to define the music, for example, if you click in the Song box and enter White Flag, then that's enough to play White Flag on Dido's Life For Rent album. You can also enter an album into the Album box, like Life For Rent and the whole album will play, or enter a playlist into the Playlist box.
There is a problem when you have two or more songs with the same title, like Deep Purple's Black Night in studio and live versions. In this case, you should enter two or more identifying properties, such as the song title and album name.
A problem arises if you want to give your publication to someone else. If you specify a music link, will the recipient have the music on their iPod? If they haven't, then they can't play it. You could bundle the music with the publication (copyright permitting), but you would need to tell the user to add the music to iTunes and sync with their iPod before reading the publication though.
Music links in the Music Editor are M1, M2, M3 and so on. If you return to the main editing window, you can enter the link text for the background music in the Link; box and enter M1, M2, M3 or whatever in the To: box. This works for the Background Music and the regular table of links.
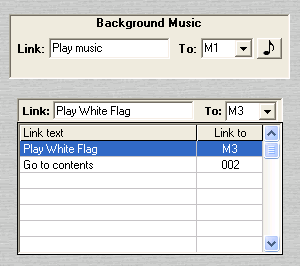
The links table on the right shows the link text and the page or music you are linking to. These links are placed at the foot of the page. However, there is a way to insert them into the text. If you place < and > around some text in the text editing box (looks like an iPod screen), then the text becomes a link within the text. The first time you use < and > to enclose some text, the first link in the links table is used. The second time you enclose some text with < and >, the second link is used, then the third and so on.
The links table on the right stores the link text and link for all the links. If you do not enter any link text, then no link is inserted at the foot of the page. However, if you use < and > to enclose text on the page, the link is inserted in the text. This means that you are not forced to use a list of links at the foot of the page. Use < and > to define link text in the page text and just enter the link destinations in the link table, leaving the link text blank.

The first link in the links table is associated with the first text enclosed by < and >. The second link is associated with the second item enclosed by < and >. In the example above, Contents will be a link to page 002 and About will be a link to page 003.
iDoc Writer can import iPod Notes. Select File, Import and then use the controls to go to the folder containing the notes. The folder should be open and not simply selected, and you should be able to see the list of notes files (plain text files with a .txt file extension). This is not meant to be a general text import and it is specific to iPod notes. If you have started a project using some other software, you can import the text files into iDoc Writer, or if you publish a project and lose the original project file, you can import it.
If the iPod is connected, you can use the drive selector to select it and then navigate to the iPod's Notes folder. Open the folder you want to import and click Import.
It is possible to import plain text files too. However, they must be under 4k each because that is as much as the iPod can read in a single note file.
When files are imported, the links are kept within the text, so you will get something like this:
|
Your Project |
|
Link Text |
Link To |
|
This is the imported text. A <link> is placed within the text.
|
|
|
005 |
|
|
|
|
|
|
|
|
|
Link Text is empty and the items under Link To refer to the links in the text. The first block of text enclosed by < and > is the first Link To entry, the second block of text between < and > is the second Link To entry and so on. Music links are imported into the music editor and are referred to as M1, M2 and so on.
The import facility may or may not cope with non-standard files.
The project planner can be used to create either a whole publication or just a small section of a larger publication. It displays a 5 x 5 grid of pages. If you enter some text into a text box, it is saved as a page. Blank boxes are not saved. You can use this to quickly map a publication by creating a rough outline of each page, or you can type in the whole page contents if you want. Seeing all your pages in this way, helps you to organise your publication.It is especially useful for interactive adventure stories. Take a look at this screen shot:
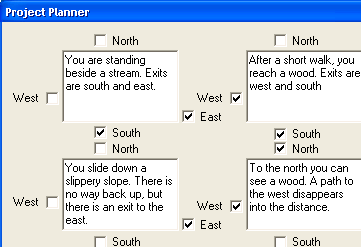
Tick the boxes to insert links to other pages. Although the links are called North, South, East and West, at the foot of the window, you can define your own link text. For example, you can replace West and East with Left and Right, or Forward and Back, or Previous and Next. North and South can be Up and Down. It's up to you.
Plans can be saved by clicking the Save button. This writes them to disk and it does not affect the current story in memory. Click Load to load a plan. It is useful to have the Planner on the screen at the same as you are editing a story. You can then edit the text or links on each page while referring to the plan. Click Insert in the Planner to insert the plan and the pages are pasted into the iDoc project starting at the page number at the foot of the Planner window.
You can't import pages into the Planner, but the pages are remembered, so you can go back into it and change things, or insert the pages elsewhere as a copy.
The Planner is a very useful tool once you get the hang of it. You can easily plan a publication or game without the need for a pencil and large sheet of paper.
One of the most irritating things about reading notes on the iPod is navigation. If you select note1, jump to note2 via a link, then jump to note3 via a link, you can only get back to the Notes menu by pressing the Menu button to backtrack. It works like the Back button in the Web browser, so from note3 you go back to note2 then back to note1 and finally back to the Notes menu. This isn't so bad with documents that have just a few links, but with a 300-page interactive adventure, you might have to spend five minutes tapping the Menu button to get out of it. Blame Apple, not iDoc Writer because it is a feature of the iPod. If you really don't want to do this, just reboot the iPod instead: Hold down the Menu and Play/Pause buttons for six seconds.
Some characters cannot be used in project names because they are used to create a folder on the iPod to store all the documents. A folder name cannot include characters like \, /, *, ? and a few others, so stick to letters and numbers to be safe. You can't use < or > in the text because they are used to indicate links.
The iPod has a limit of 1,000 notes. Although iDoc Writer allows you to create up to 999 pages, this would leave no room for any other notes, so it is best not to use up all the available space. Limit your publications to no more than 500 pages so other applications can create notes. You can create about 49 links per page and 100 music items can be defined.
The iPod reads only the first 4k (4,000 characters) of a note and if a note is longer, the remaining text is ignored. If you have a lot of text, split it over two or more pages and place a link at the bottom of each page to go to the next.
iDoc Writer (c) 2004 R.A.Waddilove
Web site: www.rawcomputing.co.ukSupport: support@rawcomputing.co.uk
General: info@rawcomputing.co.uk
iDoc Writer is supplied as shareware. You are free to try the program for a period of 30 days. You can give the program to others to try too. If you want to continue using the program after the 30-day trial period, you can purchase a serial code for a small fee. Go to www.rawcomputing.co.uk and click on Order. The serial code is emailed to you within a day or two of receiving payment. Just enter it the next time you run the program.